Shaved Fennel & Apple Salad with Blue Cheese

I hesitate to post a salad like this because it is more a list of ingredients than an actual recipe, but I’m going to anyway because it is just that tasty.  Plus, if you’ve been looking for a reason to buy a mandoline, this salad is the perfect excuse.

This simple salad is as welcome on your table as an easy weeknight dinner with a simple piece of fish or chicken breast as it is a side or starter when entertaining.  Recently, I served this raw fennel slaw after a dinner of braised short ribs.  It was perfect as a crisp refreshing end to a somewhat heavy (but super delicious) meal.  It’s like having a salad, cheese course, and dessert all on one plate.

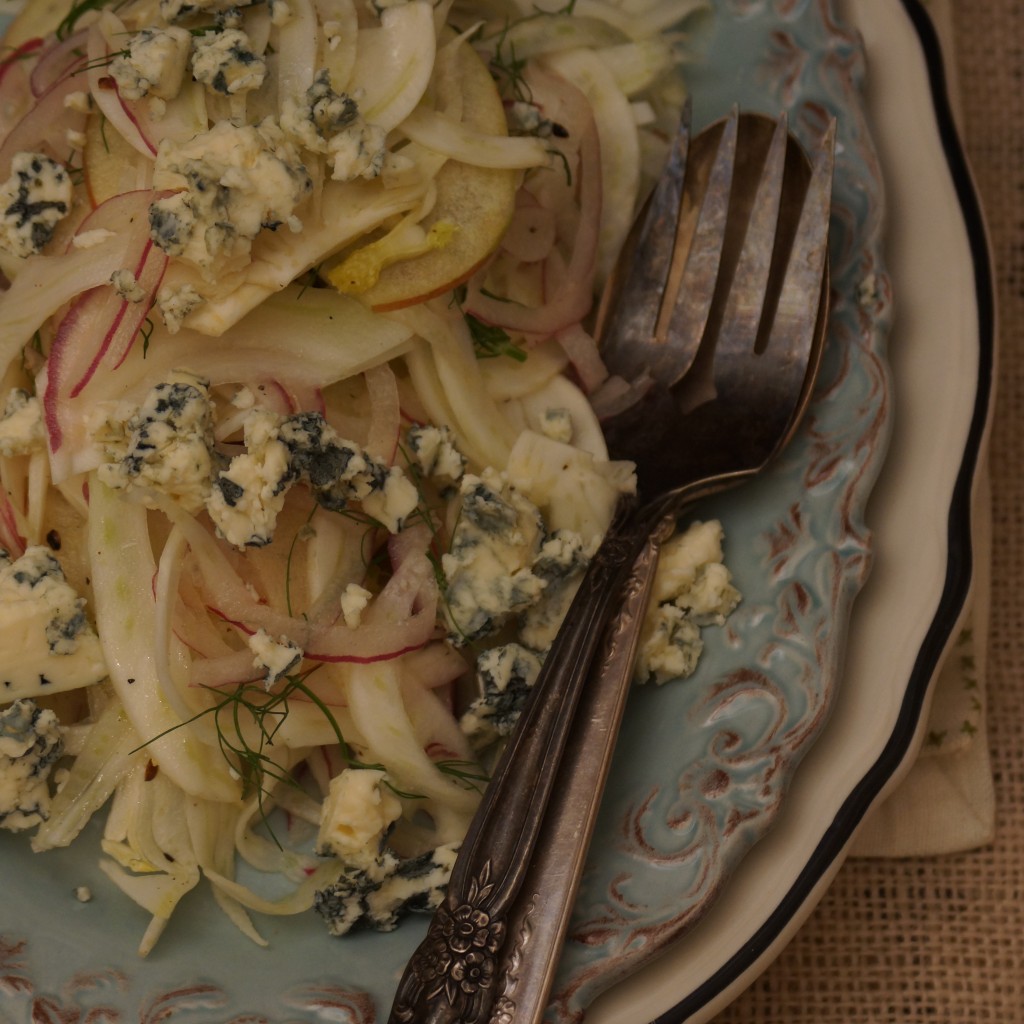
Let’s put it together.  Four proud ingredients: Fennel, Apple, Red Onion, Buttermilk Blue Cheese.

There’s nothing to making this salad.  We’re just going to shave the apple, fennel, and onion.  You can use a knife, a box grater, or a mandoline.

It only took me five minutes to prep the ingredients with my handy mandy.  Best gift, ever!

Throw your shaved vegetables in a big bowl, season them up, toss with wispy fennel fronds.

Transfer to pretty serving plate, mound it up nicely, and sprinkle with blue cheese.  That’s it.  Five minutes.  Simple and tasty.  Pretty, crisp and flavorful.  You’re done.  You’re amazing.


Shaved Fennel, Apple & Red Onion Salad with Blue Cheese
 
Prep time
Total time
 
This salad is great with a simple fillet of salmon or chicken breast for a light dinner or wonderful as a refreshing side with a heavier main course. All ingredient amounts are approximate, add and subtract to suit your taste.
Author:
Serves: 4-6
Ingredients
  • 1 large bulb Fresh Fennel, fennel fronds reserved
  • ¼ large Red Onion
  • 1 medium Honeycrisp Apple
  • Fresh Lemon Juice
  • Olive Oil
  • White Wine Vinegar
  • Salt & Coarse Ground Black Pepper
  • ¼ c. Buttermilk Blue Cheese, crumbled
Instructions
  1. Shave fennel, onion, and apple on mandoline. If you don't have a mandoline, just slice ingredients as thin as you can. Sprinkle apples with lemon juice to prevent discoloration.
  2. Toss shaved vegetables and apples in large bowl, along with the feathery greens from the top of the fennel. Season with salt and pepper, dress with olive oil and vinegar.
  3. Transfer to a serving plate and top with crumbled blue cheese.


Ale-Steamed Mussels with Garlic & Kale

I have a confession.  Actually, it’s more of an admission; it’s not something I feel particularly bad about.

I judge books by their covers.  It’s not because I’m shallow, or (just) because I like pretty things, it’s because I think if a lot of care was given to the content of a book, the author will want the same level of attention paid to the outside.  Sometimes this works out really well for me and I discover a great read I may not have otherwise found.  Other times I end up with books, well-written or not, on a subject I have zero interest in.

So what does this have to do with anything?  Well, it seems I apply these same principles when buying beer and on occasion I end up with a beautifully labeled six-pack containing sour-mash ale that, while I’m sure it was masterfully brewed, I have little desire to drink.

Have you ever had a sour-mash ale?  This was my first.  It tasted, to me, like equal parts puckery Sauvignon Blanc, crisp lager, and tart lemon juice.  I didn’t want to drink it, but I certainly didn’t want it all to go to waste either.  So what do you do when life hands you really lemony beer?

I steam mussels.

It turned out to be a brilliant solution.  I love mussels steamed in beer or white wine with a squeeze of lemon.  This is the perfect mussel steaming liquid, neatly contained in one (beautiful) bottle.

I’m going to toss some kale in to steam with my mussels so I can call it a complete meal.  Plus the kale will look charmingly like seaweed when the dish is complete.

Saute some shallots, plenty of garlic, pinches of red pepper flakes.

Add kale, let it work up a thirst, and buy it a beer.

When it gets nice and steamy, it’s time to add your mussels.  Yes, I wear a lot of stripes.

Steam until the shells pop open.  Toast thick slices of baguette, rub with garlic, drizzle with oil.  Set the table with plenty of napkins, a discard bowl for the shells, and a tower of after-dinner mints.


Ale Steamed Mussels with Garlic & Kale
 
Prep time
Cook time
Total time
 
I used sour-mash ale simply because I had on hand. You could use white wine or any beer and a little lemon juice. I added kale to make this a complete meal but feel free to leave it out if you are serving these mussels as a starter or with a salad on the side.
Author:
Serves: 2 entrees or 4 appetizers
Ingredients
  • 2 lbs. Mussels, cleaned and debearded
  • 1 Shallot, sliced
  • 4 cloves Garlic, sliced, plus a couple additional cloves for bread
  • Red Pepper Flakes, to taste
  • ½ bunch Kale (optional), center stalk removed and chopped
  • 1 bottle Sour-Mash Ale (or white wine and lemon juice or a different type of beer)
  • Extra Virgin Olive Oil
  • Baguette, sliced and toasted
Instructions
  1. Heat 2 Tbsp. olive oil in heavy-bottomed pot over medium-high heat. Add shallot, saute briefly. Add garlic and red pepper flakes, allow to become golden but do not burn.
  2. Add kale, if desired,season with salt, and allow to wilt slightly. Add beer and bring to boil.
  3. Gently (you don't want to break any shells) add mussels to pot, cover, and allow to steam until shells open, about 5 minutes.
  4. Meanwhile, rub toasted baguette with raw garlic and drizzle with oil.
  5. Serve mussels in warm bowls or straight from the pot with plenty of the toasted bread to soak up the steaming liquid.


Strawberryplum Celebrates + Top 10 Lessons Learned in my 1st Month of Blogging

Thanks for stopping by to help celebrate strawberryplum’s 1 month anniversary!  I know a month is not long in the world of food blogging but in just a month I’ve learned an awful lot and I am anxious to continue sharing my cooking adventures and recipes.  That’s worthy of a little celebration, wouldn’t you say?

Here’s a run-down of the top 10 most valuable lessons I’ve learned while blogging.

+ How to upload pictures without breaking the computer (Sorry, sweetie, I swear those days are behind us)

+ How to spell carAmelize (So tempting to leave out that second a)

+ What on earth a widget is (They’re these handy little apps you download to help organize the blog and hopefully make it easier for you to navigate)

+ That you really shouldn’t try to take pictures of food if you don’t have much time (Sorry again, sweetheart.  Have I told you how nice you look today?)

+ Blogging about cooking and eating takes waaaaaay more time than the actual cooking and eating

+ “Just Enough” is not a real measurement and people will never bother with my recipes if I continuously call for pinches, bits, glugs, and splashes

+ How to turn certain phrases into links to lead readers around my blog and beyond

+ Writing can be really fun when you aren’t doing it for a professor or boss

+ Writing can be really difficult sometimes (Like when you’re a career server and haven’t written more than a casual email in the five years since you’ve been out of school…)

+ Family, friends, and Internet acquaintances are more encouraging and supportive than I ever thought possible (Thanks for the comments- I love reading them and knowing you’re out there!)

That’s enough to celebrate.  I’ll grab the bubbly.  Thanks for being here, for your advice, your encouragement.  Here’s to 1 month and to many more.  See you soon!


Salted Espresso-Oat Cookies with Nutella Cream

I baked for you again.

Why?  As if I need a reason!  Because you’re you and I’m so glad you’ve found your way over to strawberryplum.  Plus, it’s Monday and you really look like you could use a little cookie love about now.

And, to be perfectly honest, it wasn’t a completely selfless act.  I did manage to combine four of my favorite ingredients into one awesome sandwich cookie.  Let’s hear it for oatmeal, espresso, sea salt, and Nutella.

Prepare for cookie action.  Softened butter, sugars, oatmeal, egg, flour, espresso powder.

Put it all together.  You know the drill.  Cream the butter and sugar, add an egg, finish with dry ingredients.

Roll your dough into uniform balls.  Normally, I’m not too precise, but today I’m going to sandwich these cookies so I want them to be fairly similar in size.  Press and flatten dough balls.  I’m going to sprinkle mine with some flaky sea salt because I like my sweets a little salty and my savories a little sweet.


Bake, cool.  You could stop right here, grab the milk, and  get down to cookie eating…

…or you could be like me and get a little cookie-kooky.  I’m about to define the term “gilding the lily”.

Ahhh…my cookie fantasy, come to life.  What a world.


Salted Espresso- Oatmeal Sandwich Cookies with Nutella Cream
 
Prep time
Cook time
Total time
 
These cookies are delicious with or without the Nutella filling.
Author:
Serves: about 24 cookies
Ingredients
  • 1 c. All-Purpose Flour
  • 2 tsp. Espresso Powder
  • ¾ tsp. Baking Powder
  • ½ tsp. Baking Soda
  • ½ tsp. Salt
  • 14 Tbsp. (1¾ sticks) Butter, softened
  • ½ c. Granulated Sugar
  • ½ c. Light Brown Sugar
  • 1 large Egg
  • 1 tsp. Vanilla
  • 2½ c. Old-Fashioned Rolled Oats
  • Flaky Sea Salt (optional), to taste
    For the Filling
  • 3 Tbsp. Butter, softened
  • ⅓ c. Nutella (chocolate- hazelnut spread)
  • ⅓ c. Powdered Sugar
  • 1 tsp. Espresso Powder
  • pinch Sea Salt
Instructions
  1. Heat oven to 350°. Line baking sheets with parchment.
  2. Combine flour, 1 tsp. espresso powder,baking soda, baking powder, and ½ tsp. salt in medium bowl.
  3. In the bowl of an electric mixer, cream butter and sugars until light and fluffy, about 1 minute. Add egg and vanilla, beat to combine.
  4. On low speed, slowly add dry ingredients, mix until just combined. Stir in oats.
  5. Form 1 Tbsp. balls of dough and flatten slightly with juice glass. Sprinkle with flaky sea salt and bake until golden, about 10 minutes. Allow to cool completely before sandwiching.
  6. For the filling- Whip together butter, Nutella, powdered sugar, espresso powder, and pinch of salt until light and fluffy. Spread filling on bottoms of half the batch of cookies and place another cookie on top to sandwich.

Crema di Ceci with Porcini & Pine Nuts

I could have called it creamy chickpea soup or cream of garbanzo bean, but I didn’t want to scare you off by using a name that sounds like it belongs on a can of condensed soup or as if it relies heavily on cream.   No, I’m better off calling it by it’s Italian name- Crema di Ceci.  Say it with me- “chay-chee”.  Much better, right?  Now this simple soup has a bit of intrigue, sounds a little more exotic,  a lot more delicious.  Good enough to necessitate opening a bottle of red wine.  How many other bean soups can do that?

Sometimes it’s all in the branding and I want you to make this, after all.  And you have no reason not to!  In addition to being downright tasty, this soup is warming, nourishing, and healthy.  It’s vegan without even thinking about it, getting all its creaminess from the pureed legumes.  It is easy to make as long as you remember to get your beans soaking the night before (and have some nice vegetable stock on hand) but if you want to cheat and use canned chickpeas, your secret is safe with me.

This soup, like most pureed soups, is delicious as is but a little garnish is always welcome to provide a contrast of textures and flavors.  Since today we gave this soup a charmingly Italian name, we’ll go that route on the garnish by adding Porcini and Crimini mushrooms and a sprinkling of pine nuts.

Flavor still life…or natura morta, if you prefer.  Onions, herbs, mushrooms, garlic, pignoli.

Let’s get this soup underway.  Cook your beans.  You get an hour of downtime.  You could use this time to make vegetable stock or mix up a quick batch of foccacia.  Your soup would appreciate either gesture.

Like I said, there is nothing difficult about making this soup.  We’ll get some onions into the pot, let ’em sweat, let them get a little color.  Add garlic, a dab of tomato paste.

Toss in your cooked beans, cover with stock.  Let it bubble away for an hour.  Make yourself a cup of tea and relax; this soup doesn’t need a babysitter.

When the beans are super tender and creamy, you are ready to puree.  I used my new immersion blender to get the job done but you could toss it in the food processor and buzz ’til smooth.


Soup’s ready.  Now let’s garnish.

I wish I could get my hands on some fresh Porcini mushrooms, but they’re a little hard to come by in these parts and if I were to find them, I’m sure they would be prohibitively expensive.  Instead, we’ll soak some dried Porcini in hot water and make them do double time, sautéing them with the Crimini and adding their soaking liquid to the soup to make it even earthier and more aromatic.

Sauté sliced Crimini mushrooms and add the soaked Porcini.  Let them get in touch with their dark side.  Splash in a little Marsala, add a sprinkling of herbs.

Ladle up your soup, top with mushrooms, toss on pine nuts.  Bam.  Dinner.  Done.


Crema di Ceci with Porcini and Pine Nuts
 
Prep time
Cook time
Total time
 
I've used mushrooms as a garnish in this recipe but you could customize this basic pureed chickpea soup with a sprinkling of spiced nuts,a dab of truffle butter, fried chickpeas, shaved Parmesan, crispy prosciutto, herb infused oil, garlic croutons...
Author:
Serves: 4-6
Ingredients
  • 1½ c. Dried Chickpeas (Ceci Beans, Garbanzo Beans), soaked overnight
  • 4 T. Extra Virgin Olive Oil, divided
  • 2 small or 1 medium White Onion, diced
  • 3 cloves Garlic, minced
  • 1 T. Tomato Paste
  • 4 c. Vegetable Stock
  • Fresh Rosemary
  • Fresh Sage
  • Lemon Juice, to taste (optional)
  • ¼ c. Dried Porcini Mushrooms (reconstituted with boiling water, water reserved)
  • 1 c. Fresh Crimini (Baby Bella) Mushrooms, cut into thick slices
  • 1 clove Garlic, minced
  • 1 T. Dry Marsala
  • 1 T. Flat Leaf Parsley, minced
  • 2 T. Pine Nuts (pignoli), toasted
Instructions
  1. Drain and rinse soaked chickpeas. Place in medium saucepan and cover with cold water. Add a halved onion, sage leaves, and bay leaf for additional flavor, if desired. Bring to boil, reduce to simmer. Skim any foam that rises to the top. Cook beans about 1 hour, until tender. Remove from heat, remove onion, sage and bay leaves, season with salt. Do not drain.
  2. In a heavy bottomed pot, warm 3 T. olive oil over medium-high heat. Add onions and saute until golden. Add 3 cloves minced garlic and tomato paste, stir to coat onions and allow tomato paste to get a little darker.
  3. Add beans with cooking liquid and stock. Tuck in a couple sprigs of rosemary and a few sage leaves. Bring to boil, then reduce to simmer.
  4. Simmer soup 1 - 1½ hours until chickpeas are very tender and creamy. Remove from heat, remove rosemary and sage leaves, and allow to cool slightly before pureeing.
  5. Puree soup in pot using an immersion blender or in batches in a food processor or conventional blender.
  6. For the mushroom garnish, heat 1 T. olive oil in saute pan over medium-high heat. Add Crimini mushrooms, saute until they have released liquid and are dark brown. Add soaked Porcini mushrooms and garlic, season with salt. Add Marsala, allow mushrooms to absorb. Remove from heat, season with black pepper, some chopped rosemary and parsley.
  7. Meanwhile, reheat pureed soup, thinning with Porcini soaking water. Season with salt and pepper and add a squeeze of lemon juice if acidity is needed.
  8. Ladle soup into warmed bowls. Top with sauteed mushrooms and sprinkle with toasted pine nuts.